1. Wrapping texts in a single cell.
You can wrap texts in a cell. Doing this, it will display multiple lines with in the
cell. You can wrap texts in a cell by pressing ALT + Enter in the cell. Or you can go to
Format –> Cells –> Alignment and select Wrap Text.
You can wrap texts in a cell. Doing this, it will display multiple lines with in the
cell. You can wrap texts in a cell by pressing ALT + Enter in the cell. Or you can go to
Format –> Cells –> Alignment and select Wrap Text.


2. use of Enter key
When you hit the ENTER key in Excel, you will automatically drop down to the
cell just below it. But you can change this default and change this feature.
a. Go to Tools -> Option
b. Select the Edit Tab
c. Under Move Selection after Enter, you can either select a different
Direction for the drop down box, or remove the check in front of the option according to your need.
Note: If uncheck it, the ENTER key will not move
you to another cell rather you’ll need to use the arrow keys to move around.

3. Current date or time
You can use the following formula to get current date with time in excel.
=NOW() ?shows both, current date and time.
=TODAY() ?shows only today’s date.
You can use the following formula to get current date with time in excel.
=NOW() ?shows both, current date and time.
=TODAY() ?shows only today’s date.

In bonus with this trick, =Time(hours, minutes, seconds) value gives you the time you entered in specific format.
For example: =TIME(1,2,3) outputs, 1:02 AM
=TIME(21,2,3) outputs, 9:02 AM
4. Shading the rows alternately
This tips can be helpful if you most of the time gets confused on the rows you are watching. Applying shades as you have seen in most of the graphical representation papers around you helps you to avoid confusion.
This tips can be helpful if you most of the time gets confused on the rows you are watching. Applying shades as you have seen in most of the graphical representation papers around you helps you to avoid confusion.
To do this,
• Highlight the range of cells or rows or columns that you want to format by left clicking and dragging the area.
• Go to Format–>Conditional Formatting
• Highlight the range of cells or rows or columns that you want to format by left clicking and dragging the area.
• Go to Format–>Conditional Formatting

• In the Conditional Formatting dialogue box, select Formula Is from the first drop-down list box, and enter =MOD(ROW(),2)=0 in the second box.

• Click the Format button to bring up the Format Cells dialog box.
• Select the Patterns tab and specify a color for the shaded rows.
• Select the Patterns tab and specify a color for the shaded rows.

• Click OK twice to return to your worksheet.
5. Change the color of sheet names:


Right click on sheet you want to change the color of and select “Tab color” option to change the worksheet tab colors. Group them with similar colors if you have lot of sheets, it lets you to easily recognize the specific sheet.
6. Sort the texts from Left to right instead of up to bottom

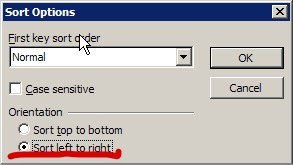
If your data flows from left to right instead of top to bottom, just change the sort orientation from “sort options” in the Data –> sort menu–> Option.
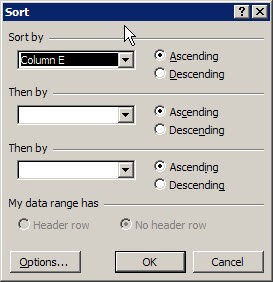

If your data flows from left to right instead of top to bottom, just change the sort orientation from “sort options” in the Data –> sort menu–> Option.


7. Move or copy a worksheet
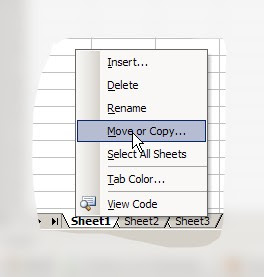
You may know that you can just drag and drop a worksheet to a different spot in the workbook. But for you folks who get joy from dialog boxes (and truthfully, this one gives you more options), here you go:
To move or copy a worksheet
1. Right-click a tab, and then click Move or Copy on the shortcut menu.
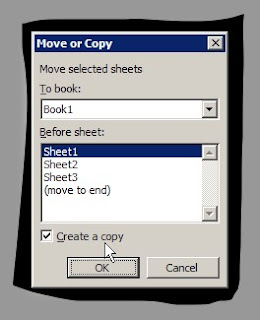
2. In the Move or Copy dialog box, you have options:
o To move the worksheet to a spot within its own workbook, select a sheet in the Before sheet box.
o To move the worksheet to another open workbook, select the workbook in the To book list and then click OK.
o To keep a copy of the worksheet you’re moving in this workbook (rather than just moving it), select the Create a copy box.
8. Insert a line break in a cell
Press ALT+ENTER to start a new line while you’re typing or editing data.
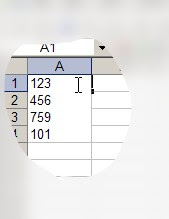
Press ALT+ENTER to start a new line while you’re typing or editing data.

9. Skip through your worksheet using shortcut
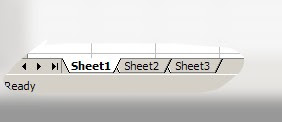
As you use ALT + TAB to skip through the opened program window in windows you can skip through the worksheets.
To move one worksheet to the right
* Press CTRL+PAGE DOWN.
As you use ALT + TAB to skip through the opened program window in windows you can skip through the worksheets.
To move one worksheet to the right
* Press CTRL+PAGE DOWN.
To move one worksheet to the left
* Press CTRL+PAGE UP.
* Press CTRL+PAGE UP.
10. Calculator in excel toolbar
Excel is the master of calculator, but sometimes you need a handy calculator. To get the calculator in the toolbar,
• On the View menu, click Toolbars, and then click Customize.
• Click the Commands tab.
• In the Categories: list, click Tools, and in the Commands: list, click Custom(Important: The one with the gray calculator graphic!).
• Drag the selected command from the Commands: list to a toolbar.
• Click Close.
No comments:
Post a Comment